Tiramisu for my colleagues

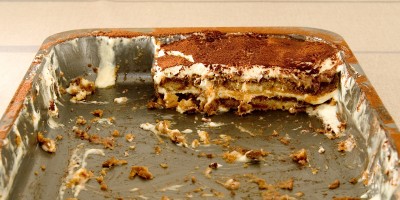
When you have colleagues like mine, taking a photograph of the tiramisu before it was eaten isn’t a suggestion that’s likely to be accepted – so you will have to contend with a picture of what was left:

They did all enjoy it, and all my hard work yesterday wasn’t entirely wasted.

Recipe

The amounts are for about 12 people, and they can probably be multiplied. You could probably halve it as well, but making much less than that is an affront to the recipe! 😉

Ingredients

  • 8 dl espresso (or strong coffee)
  • 2 dl amaretto or marsala – I like amaretto
  • 500 grams lady fingers (savoiardi) (or more or less, depending on the tray you use)
  • 200 grams sugar
  • 8 egg yolks, pasteurised
  • 8 egg whites, pasteurised
  • 750 grams Mascarpone cheese
  • Vanilla
  • Cocoa powder

I used 750 grams instead of the 1000 grams recommended in the book I adapted it from (Spise med Price, DR Forlag 2008). I liked the result, though some more of the cheese might be nice. It wouldn’t have fit in the tray I used anyway.

Method

Brew the coffee, mix it with the amaretto and leave it to cool.

Mix the egg yolks, sugar and vanilla – I just added more to taste later – and whip until light and fluffy. This will take a while. Mix in the Mascarpone. Whip the egg whites and fold them in, to make the mixture lighter.

Pour the coffee mix in a flat-bottomed container, and dip the savoiardi sugar side up, so the mixture almost reaches the sugary bit – lift them up right away, and place sugar side down in the tray. Cover the entire bottom of the tray this way.

Cover with a layer of the egg-cheese mixture, about 1 to 1.5 cm thick. Use about half of the amount you have. Add another layer of savoiardi, and another layer of the mixture, making sure to level it out nicely.

Cover, for instance with aluminium foil, and refrigerate for at least 6 hours – I had mine in the fridge for 18 before serving.

Right before serving: Dust with cocoa powder – not the sugary stuff used for making drinks, but pure cocoa. Enough should be added that it looks like a dry layer on top of the tiramisu (in my opinion, anyway).

Probably stores well, but there’s not going to be much left anyway 😉

Depending on how long you dip the savoiardi, the tiramisu will taste more or less of coffee, and be more of less mushy. Finding the right balance can be a pleasurable job, as you need to make a new tiramisu each time 😉 There’s a bit of work in making a tiramisu, but it’s lots of fun, and it tastes great. It may not be too healthy to eat it all oneself, though.
“Real” tiramisu?

I’ve been looking to make some tiramisu, and for that I’ve decided on a recipe. It’s from “Spise med Price”, a Danish cookbook made to accompany a TV show of the same name. This recipe uses – for 6 persons – 4 egg yolks beaten with 100 grams sugar, with Mascarpone mixed in (500 grams), lightened with 4 beaten egg whites. Easy.

However, when I went to get the ladyfingers to use for the recipe, it had a different recipe. This called for – for 5 persons – 3 egg yolks, sugar and only 250 grams Mascarpone. Still the same with the egg whites.

Curiosity now piqued, I looked at my new Joy of Cooking for a recipe – and lo: 12 servings needs 5 egg yolks, half a cup whipped cream(!), and about 400 grams Mascarpone. This is quite different, since it uses whipped cream instead of the egg whites – and doesn’t seem to need as much amount of filling as the others.

I decided to press on and look at my Italian cookbooks, namely one called “Culinaria Italia” and one called (in Danish) “Italy – temptations of the Mediterranean”. The first calls for 4 egg yolks, a cup whipped cream and 500g Mascarpone, while the second (for 4 people) uses 2 egg yolks and whites and 250g Mascarpone – same proportions as the original one I looked at.

To sum up: To make tiramisu, you need a number of egg yolks and some Mascarpone, between 30 and 80 grams per person, and either whipped cream or beaten egg whites to lighten it with. And I haven’t even started to look at whether to use Marsala, Amaretto or other sorts of liquor for the ladyfingers…

What’s your favourite way to make tiramisu?

Danish Design in Batman: The Dark Knight

The latest Batman movie, The Dark Knight, includes quite a few instances of Danish design. Having moved to a new flat recently, and not actually having bought all my lamps yet, I am quite attentive to nice lamps I see around town when shopping and such. And lo, there were some in The Dark Knight as well:

AJ Gulv

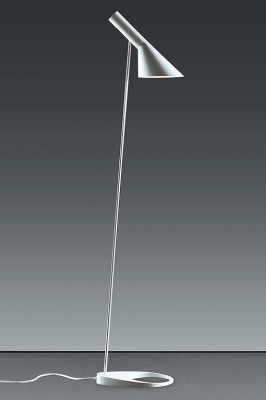
Arne Jacobsen floor lamp

Arne Jacobsen floor lamp

The Arne Jacobsen floor lamp was designed in 1957 for the SAS Royal Hotel in Copenhagen. Bruce Wayne has a number of them in black in his Gotham City penthouse apartment.

PH 4½/3½ (or one like it)

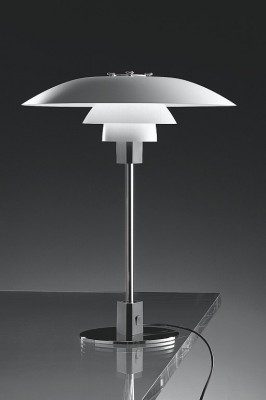
PH glass shade lamp

PH 4½/3½ lamp

The Poul Henningsen glass shade lamps were designed in the middle of the 1920’es, and based on a logarithmic spiral. The mayor of Gotham City has one in his office in the movie.

Apart from that, one of my friends noticed a Danish designed Kirk telephone in it as well, Bang & Olufsen are getting more business because one of their stereos was featured in it, and I’m certain more of the furniture was Danish designed as well. I like this trend.

Sigfreds Kaffebar: Good coffee in Ã…rhus

Writing a post like this in English might seem a little strange – but at least it will be readable for foreigners who may want to visit Ã…rhus: I’ve found a nice place for coffee in Ã…rhus. It’s Sigfreds Kaffebar.

For anyone who knows Ã…rhus, it probably shouldn’t come as a big surprise. Sigfreds is known as a place of good coffee, and even though we have the Starbucks-style Baresso around here as well, producing somewhat consistent quality coffee, Sigfreds is just a different league – and a wholly different atmosphere. It’s a lot more cosy and café-like. Unfortunately, I don’t have a picture to place here, but I think I’ll be going back tomorrow and might get one.

I had a cortado, basicly a double espresso with about the same amount of steamed milk in it, for 32 kroner. It doesn’t come with any accessories, apart from an optional glass of water, but it didn’t need any: The taste was great. Freshly ground beans, and judging by the videos on the website and the behaviour of the barista, a very keen attention to hygeine and cleanliness. Thoroughly recommended.

Chocolate coated pineapple rings

I’ve come up with a plan. A masterly plan, to leave me independent of the chocolate store near where I work: I am going to make my own chocolate coated pineapple rings.

The first attempt is in my fridge now to cool down – some might say that choosing a day with my kitchen at 30-some degrees celsius as the day to test out my idea wasn’t smart, and I’m inclined to agree – tempering chocolate, when the ambient temperature is higher than the level you’re trying to cool to isn’t easy.

Not giving up that easily, I decided to follow David Lebovitz’s instructions for tempering chocolate, albeit not with quite the care I might do in the future. Looking in my fridge now, it seems I didn’t succeed – partly due to my thermometer being too slow, and partly due to not having the patience to wait for the temperature to go down. I’ll have to do a bit more work on this in the future.

The biggest problem was probably the unexpected viscosity of the chocolate: Pouring it in a way to coat the pineapple rings was far from as easy as I’d thought. Perhaps that’s a problem with temperature, but it seemed that the chocolate I was using didn’t really want to be poured, as much as it wanted to sit in a thick, smooth but unmoving mass. I’ve looked a bit at some websites about additives in chocolate, and I think the answer may be trying out adding some lecithin, a soy or egg yolk extract used as an emulsifier to make chocolate pourable. Perhaps making an improvised mould for the rings would make things a little easier

Pineapple rings are rather wet when direct from the tin, which also created a bit of a problem. I was prepared better for this, though, and patted them dry with some kitchen paper – perhaps other methods might be employed with more success.

There’s no pictures this time, since I didn’t really expect to succeed, but when the weather cools down I’ll try again for a slightly more serious attempt. I’ll be sure to add some tasting notes later, though, when I can’t hold myself back any further.

Edit: The results

I’ve just tasted one of the pineapple rings I made earlier, and I have a few observations. First of all, the chocolate wasn’t tempered at all. In fact, it melted almost seconds after being removed from the fridge, so I guess I’ll have to eat them all myself 😉

Secondly, the insides were too wet. I had suspected this, and come my next try, I’ll have to figure a way to dry it out. I suspect the ones used by professionals might be soaked in a light syrup, to make it a bit more candy-like. Might try that out.

Thirdly, and most importantly, the taste: I liked it. I am still very fond of the combination of pineapple and chocolate, and with just a bit of practice I’m sure I’d be able to cure some of my addiction to the local chocolate shop.

The greens have arrived!

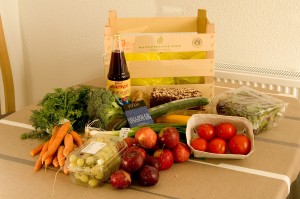
I’ve signed up to receive a box of vegetables from a Danish company called Aarstiderne every other week. Today was the first delivery, and I was quite excited to get home and see what was in it:

Fruits and vegetables from Aarstiderne.com

The contents are all organic, and even though they’re trucked around, Denmark is a small enough country that a lot of it counts as “local”, anyway. The box I got contained:

  • Emmerys malt rye bread
  • Voelkel grape juice
  • Vivani milk chocolate with almonds
  • Babyleaves – of some leaf vegetable of unknown origin as of yet 😉
  • 5 tomatoes
  • 5 plums
  • 7 apples
  • 10-or-so carrots (one gone already, yum!)
  • a box of grapes
  • a bunch of (5) leeks (edit: these are supposed to be spring onions. They’re bigger than the ones I’m used to…)
  • a head of broccoli
  • a cucumber
  • a courgette

Costs me 223kr, which is about £24 or €30.

Now I have to figure out what to use all that stuff for.

Slow bread

After buying some really nice bread at a nearby bakery, at the to my mind quite expensive price of 42 kroner for a loaf (about £4.50), I decided to bake some myself. I found a recipe on the net, and followed it pretty closely, this being the first try.

Ingredients

  • 12.5 grams cake yeast – or I am guessing, a quarter of a packet
  • 300 ml cold water or milk
  • teaspoon of salt
  • teaspoon of sugar
  • 350-400 grams high-protein flour
  • 100 grams wholemeal flour

Method

Step one, basically mix it together and knead. Okay, perhaps dissolve the yeast first in the water, and add the flour little by little. But get it mixed together, and knead well. I kneaded until my wrist started hurting, and then a bit more since it didn’t feel quite right yet. This isn’t no-knead bread.

Continue reading

All work and no play…

Last week, I started working at my new job (which is the same as the old one, but full time) at DAIMI. At the same time, moving has been going on, and I’m almost done now, only really needing to bring along a few things to put in the store room, as well as my electric piano, which I’m going to bring today.

Working full time and moving as well has taken up almost all of my time, which is why I haven’t posted much here. I’ve started cooking a lot more, and I’m really enjoying having my own kitchen and a separate living room and bedroom. So expect some news about food in not too long.

PHP is taking up a lot of my time at work, I’m trying out Zend Studio which seems to be really nice, albeit quite expensive. I may have to try out PDT to see if it’ll do the same sort of things. More about this later as well.

Lastly, if you haven’t seen them yet, you should take a look at the photos I’ve taken of my new place: The first ones taken when I was about to move in, the next ones when I got my dining table and curtains in place, and the latest with my new sofa and sort of living room arrangement.

Moving!

I’ve moved, and gotten my blog back up after I accidentally knocked it over. Pictures from the new flat are available at my gallery.

As soon as I get the last stuff moved – Monday or so I hope – I’ll take some pictures of the flat with furniture in it. I still need to get my bed, though, and because of an error on the part of the furniture supplier, that won’t be coming until the 16th. Ick. Luckily, one of my friends let me borrow his folding bed, which will have to do for those two weeks.